
In this article, we will learn how to:
- Pass data from a view to a controller
This is a very important topic in MVC, we need to learn it quite carefully.
We have already learned how to pass data from the controller to view in the second article of the series.
Send data from a view to the controller
There are 2 main ways to achieve it.
- Using form post/submit
- Using jQuery AJAX
Let’s see each of these in detail.
Form Post/Submit
We make use of the input type=” submit “ button in this case and submit the whole form.
Let’s create a ProductController and further create a GET action method that would render an AddProduct form.
Design/Create the GET view
public class ProductController : Controller
    {
        public IActionResult AddProduct()
        {
            var product = new AddProductViewModel
            {
                ProductName = string.Empty,
                ProductCategory = null,
                Price = null,
                ImportedDate = null
            };
            return View(product);
        }
    }
The AddProductViewModel
    public class AddProductViewModel
    {
        public string ProductName { get; set; }
        public int? ProductCategory { get; set; }
        public double? Price { get; set; }
        public DateTime? ImportedDate { get; set; }
    }
The AddProduct.cshtml form
@model AddProductViewModel
<form method="post">
<div class="mb-3">
<label for="productName">Product Name</label>
<input type="text" class="form-control" placeholder="Enter Product Name"
asp-for="ProductName">
</div>
<div class="mb-3">
<label for="productCategory">Product Category</label>
<select class="form-control" placeholder="Select Product Category"
asp-for="ProductCategory"
asp-items="Html.GetEnumSelectList<Enumerations.ProductCategory>()">
<option value="0">Please Select</option>
</select>
</div>
<div class="mb-3">
<label for="productPrice">Product Price</label>
<input type="text" class="form-control" placeholder="Enter Product Price"
asp-for="Price">
</div>
<div class="mb-3">
<label for="productPrice">Imported Date</label>
<input type="date" class="form-control" placeholder="Select Imported Date"
asp-for="ImportedDate">
</div>
<input type="submit" class="btn btn-primary" value="Submit" />
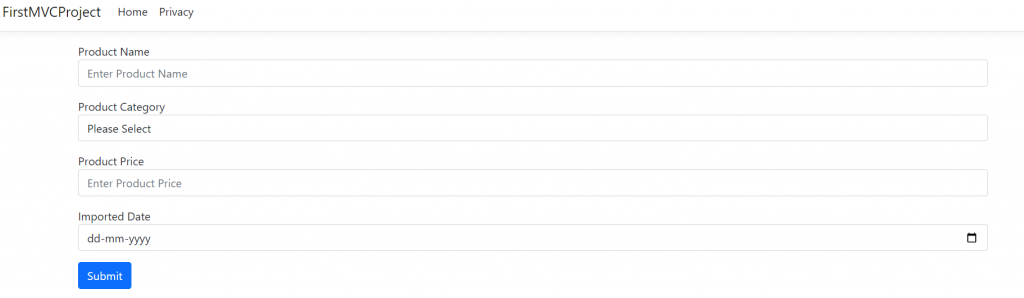
</form>The form is rendered on the browser as below, please excuse the basic design.
We are making use of asp-for tag helper to assist us in binding an input control to the corresponding model property.
asp-for tag helper renders the id and name attributes of the input control the same as that of the property that it is being equated to.
Ex: asp-for = “ProductName” will render id=”ProductName” and name=”ProductName” on the browser.
The name attribute is the most important when we pass data from the UI to the server.

Since we have designed the AddProduct view and understood the concept of asp-for tag helper, let us now create a POST method to which the form will be submitted to.
We will also have a look at various techniques to grab the data contents sent by the UI.
Create POST method
We can grab the data sent from the UI/view in the POST action method using 3 ways:
- Property Names
- IFormCollection
- Model
Using Property Names as Arguments
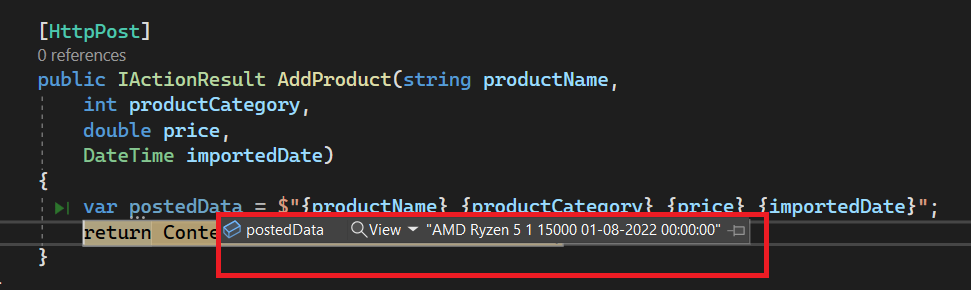
        [HttpPost]
        public IActionResult AddProduct(string productName,
            int productCategory,
            double price,
            DateTime importedDate)
        {
            var postedData = $"{productName} {productCategory} {price} {importedDate}";
            return Content("Add Product Post Method");
        }
Since we have 4 form controls on the view, we create 4 argument params to mimic the individual property names.
Please note that the argument names should match the property names (case sensitivity doesn’t matter).
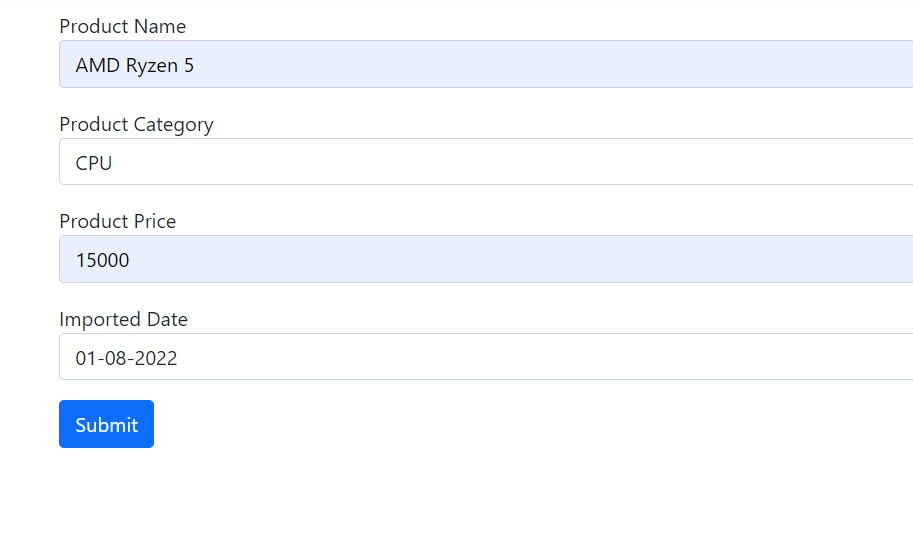
We see that the data is posted from view to controller.
One of the disadvantages of this approach is when the form becomes larger, and we have lots of input data to be posted, the argument list becomes long and cumbersome. Hence this way is not much recommended.
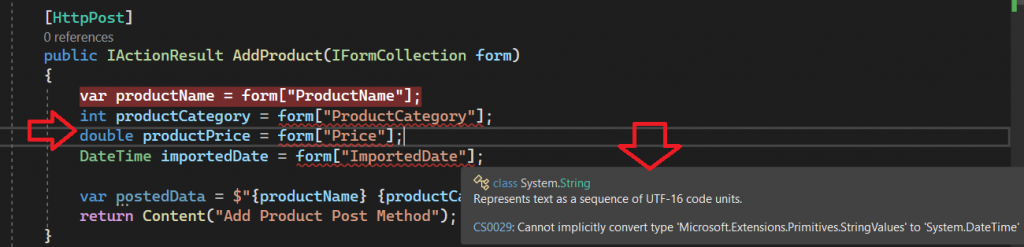
Using IFormCollection
Let’s have a look at the IFormCollection approach.
[HttpPost]
        public IActionResult AddProduct(IFormCollection form)
        {
            var productName = form["ProductName"];
            var productCategory = form["ProductCategory"];
            var productPrice = form["Price"];
            var importedDate = form["ImportedDate"];

            var postedData = $"{productName} {productCategory} {productPrice} {importedDate}";
            return Content("Add Product Post Method");
        }
IFormCollection is a collection of key-value pairs. It represents the parsed values sent with the HttpRequest.
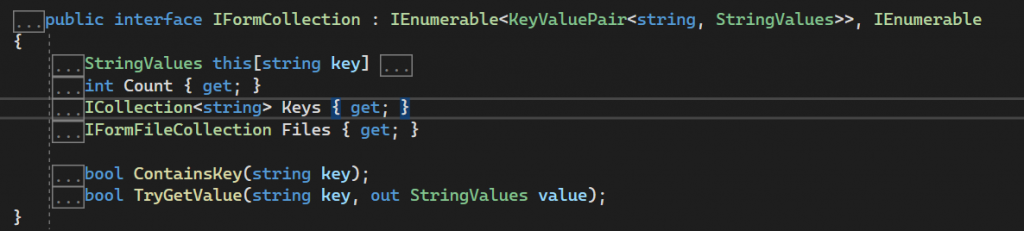
Since it’s a collection, we grab the data using the indexer approach, i.e. form[“PropertyName”]

It’s a better approach than using multiple property names as arguments, but it too has its drawback.
IFormCollection parses data as strings, so if we have data types other than strings, we get a compilation error and we need to use typecasting.
Using Model
In this approach, we will be using the model classes to grab the posted contents from the UI/view.
This approach is far better than the previous two approaches because it nullifies their limitations, let’s see it in action.
        [HttpPost]
        public IActionResult AddProduct(AddProductViewModel model)
        {
            var postedData = $"{model.ProductName} {model.ProductCategory} " +
                $"{model.ProductName} {model.ImportedDate}";
            return Content("Add Product Post Method");
        }
We use the same model, AddProductViewModel in this case.
On click of the submit button, we see that the input values are posted.

We need not write long parameter names, nor do we need to typecast any type in the Models approach. This is the best way to grab the data sent from the view to the controller.
Till now, we have seen Form Post/Submit using the input type=”submit” button, let’s have a look at the other approach – using AJAX Post via jQuery
Using AJAX Post
We will be using jQuery to post a form/part of the form, hence the readers need to know a bit of jQuery before getting started.
I recommend W3Schools for starters to get a hang of jQuery.
Let’s get started.
We will create another form (AddProductUsingJQuery.cshtml) with the same contents so that we do not update the previous code and the readers do not get confused.
        public IActionResult AddProductUsingJQuery()
        {
            var product = new AddProductViewModel
            {
                ProductName = string.Empty,
                ProductCategory = null,
                Price = null,
                ImportedDate = null
            };
            return View(product);
        }
@model AddProductViewModel
<h1>Form Post Using jQuery</h1>
<form id="ProductForm">
<div class="mb-3">
<label for="productName">Product Name</label>
<input type="text" class="form-control" placeholder="Enter Product Name" asp-for="ProductName">
</div>
<div class="mb-3">
<label for="productCategory">Product Category</label>
<select class="form-control" placeholder="Select Product Category" asp-for="ProductCategory"
asp-items="Html.GetEnumSelectList<Enumerations.ProductCategory>()">
<option value="0">Please Select</option>
</select>
</div>
<div class="mb-3">
<label for="productPrice">Product Price</label>
<input type="text" class="form-control" placeholder="Enter Product Price" asp-for="Price">
</div>
<div class="mb-3">
<label for="productPrice">Imported Date</label>
<input type="date" class="form-control" placeholder="Select Imported Date" asp-for="ImportedDate">
</div>
<input type="button" class="btn btn-primary" value="Submit" id="btnSubmit" />
</form>However, in this case, we use the input type=” button “, because we want to use AJAX to submit the form.
The form looks like this:

If we click the Submit button in this case, nothing happens because we have not hooked up the jQuery code yet. Let’s do that.
$(document).ready(() => {
$('#btnSubmit').on('click', () => {
$.ajax(
{
url: '/Product/AddProductUsingJQuery',
type: 'POST',
data: $('#ProductForm').serialize(),
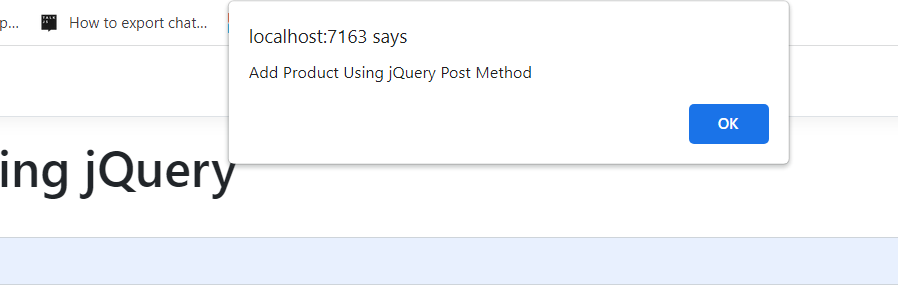
success: function (response) {
alert(response);
},
error: function (xhr) {
console.log(xhr);
}
}
);
});
});We write the above jQuery code on site.js, this file is referenced in the _Layout.cshtml and is available to all the views.
On the click event of the submit button, we are firing a POST AJAX call to AddProductUsingJQuery post method, and pass the whole Product form by serializing it.
jQuery provides us with form.serialize() method that encodes a set of form elements as a string for submission as below.
$('#ProductForm').serialize()
'ProductName=AMD%20Ryzen%205&ProductCategory=1&Price=13000&ImportedDate=2022-08-03'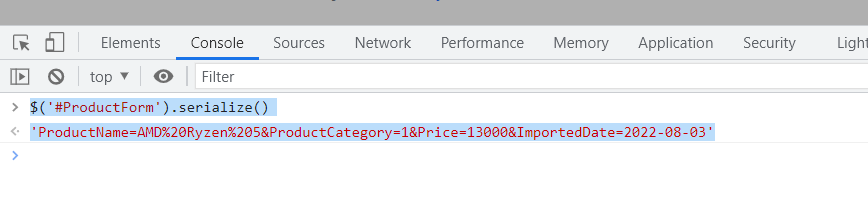
The MVC model binder understands the encoded string as name-value pairs (PropertyName=Value). As long as the property name matches, we get the correct data values.

We can use the individual property names and IFormCollection approach as well in the jQuery case, but the most used one is the Models approach, hence it is demonstrated.
Github Link
The updated code is available at – https://github.com/anurag1302/dotnet6-mvc
Conclusion
In this article, we have seen various ways to send data from view to controller.
- Form Post using input type = “submit” button
- Form Post using jQuery AJAX
Stay tuned for the next article.
May I simply say what a comfort to discover somebody who genuinely knows what they are talking about over the internet. You actually understand how to bring a problem to light and make it important. More people ought to check this out and understand this side of the story. I cant believe you arent more popular because you surely possess the gift.